Online lessons are a reality in this day and age and if done right, are a great substitute or addition to in-person sessions. They also allow long-distance learning with some of the best instructors this idiom has to offer, as well as a convenient in-home option for those drummers needing to maximize their time. However they fail miserably if the internet connection, computer, audio, video or general setup is lacking. Below is a list of information and suggestions to help make your online experience the best it possibly can be. This page is sponsored by www.cds-shop.com – everything for the pipe band drummer.
Computers, Tablets and Phones
Mac (Apple) computers, including their range of tablets and phones have certain benefits over other computers when using audio and video. They are all built with dedicated hardware and software which causes far less conflicts and problems when you use them.
PCs on the other hand (which are basically anything other than a Mac) are often built with many different components, from many different companies. The cheaper PC computers are typically made affordable by reducing the quality of hardware components used to build the computer. Some of those components include the audio, video and wifi hardware that is essential to good quality online sessions. If you know what specs to look for when purchasing a computer, then a good PC will work well and probably at a much lower cost than an equivalent Apple computer. If you’re not techie inclined though and have the budget, then it’s probably best to go with an Apple product.
However in saying all of the above, most modern PC and Apple computers, tablets and phones are all capable of running online sessions without any trouble. Older computers of any kind can get bogged down with too much software and settings installed on them. As a result, they may struggle to keep up. Purchase the best computer you can afford, and keep it clean from any extra software or settings that will slow it down. Lean and mean is the way to go.
Software
Zoom is quickly becoming the best choice for online lessons. Like most software, Zoom works best when it’s not competing for resources with any other software on your computer that’s running at the same time. Make sure your computer has no additional software open at the same time as your Zoom session.
Software also takes time to start up and close down. Computers have lots of automatic checks and tasks that they do every time they start up or come out of sleep mode or hibernation. Give your computer at least 15 minutes to start up before your lesson – just let it sit open and do its thing, while you warm up (you do warm up for your lesson, right?). Some computers have a small light on them that lets you know when the hard drive is reading or writing information. If the hard drive light is on repeatedly, then the computer is still working through some background tasks and is not ready for action. Allow it to finish all of its tasks by waiting for that light to stop flashing. Then attach your audio and video devices (if needed) and open Zoom after they’re connected to get ready for your lesson.
Internet Speed
Most people are not that interested in their internet speeds. However speeds are an important aspect of successful online lessons. There are two numbers to care about: download speed and upload speed. Download speed is how quickly you can get information from the internet. Upload speed is how effectively you can send your audio and video information to the internet for me to download on the other side. Both are important. Your ping time is also important but as long as it’s around the 50ms or so mark you should be fine.
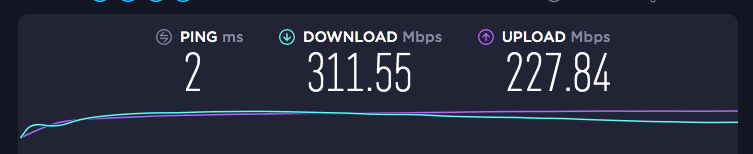
A good site to test your download and upload speed is www.speedtest.net or www.fast.com. If you visit these websites, they will test your connection and let you know how it’s performing. It’s important to test it repeatedly, perhaps over a few days and at different times of the day to track any variance. Test it also at the same time as your lesson, so you know what type of speeds you’re getting at that point. Bear in mind that a basic Canadian internet package from a company like Bell or Rogers is currently around 25Mbps download and 5Mbps upload . However, those are MAXIMUM speeds that you will probably never ever get in real life. Those are also numbers that you share with other users in your household. Phones, tablets, Netflix, computers, etc are all accessing your internet service at the same time. Zoom requires a minimum of 3Mbps dedicated to its needs alone. My internet speeds are shown below. These are pretty good numbers and way more than you’ll ever need for Zoom or Skype. My internet package is supposed to be ‘up to’ 600Mbps. You can see I’m only getting half of that in real-world numbers.
Wifi Signals
In addition to internet speeds, your wifi router and how it connects to your computer also need to be in good order. The farther you are away from the router in your home, the less reliable the signal will be. If you have a choice of the type of signal to choose when connecting to your home wifi , then bear in mind that 5G signals are faster than 2.5G signals, but 2.5G signals will travel farther than 5G signals. Simply put, it’s best to make sure you are as close to the wifi router as possible for your lesson. A wired connection to your router will also be the fastest, but that’s a little more techie to get setup and working and really not necessary if you have enough wifi signal and internet speed available.
Headphones, headset or computer speakers?
As long as one participant has a headset and microphone attached then it’s often not necessary for the other to have it as well. If you’re not the tech type, then it’s probably best to use the computer speakers and built-in microphone for ease of use. I will always use a dedicated mic and headset so if you prefer to not use one then that will work out fine. However, and this is a big however, if you are not going to use a headset, then you must make sure you are in a really quiet space when you’re having your lesson. Running water in the background of a kitchen for instance, can sound like Niagara Falls through a computer microphone. You must be in a quiet spot to be able to use your built-in mic and speakers effectively.
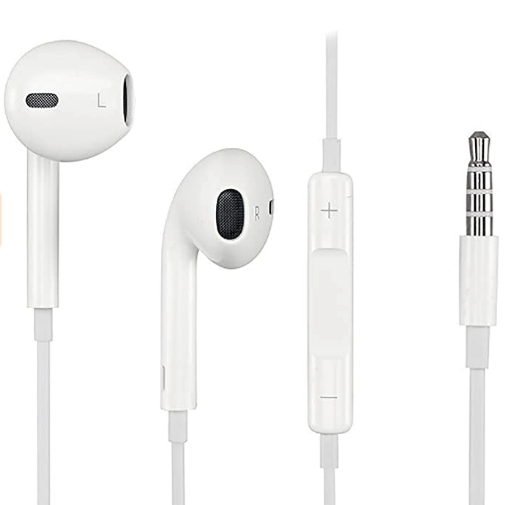
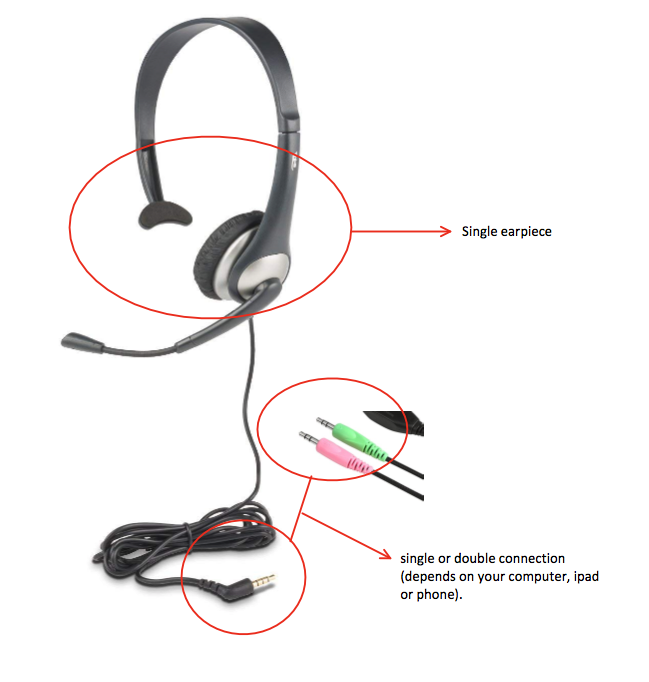
If you want to give a headset a try (personally it’s the only way to go for me), earbud type headphones with a mic attached are best. Apple earbuds or similar work really well for this purpose. Use wired over wireless varieties (bluetooth wireless devices have a slight delay which is not helpful for online sessions where delay is already an issue). Use only one earbud at a time (so you can still hear yourself playing) and make sure you use the earbud with the microphone attached to it (obvious, but you’d be surprised :-). Cable extensions can be purchased if you need more length. Do not use video gaming headsets. They are typically large, clunky, over-the-ear and closed which don’t allow you to hear your own playing clearly (which is kind of important when performing for your instructor). Below are some options to consider.
Setup
How you set yourself up for your lesson is important. If you’re using your computer’s built-in microphone, make sure the drum pad and computer are not on the same surface, or playing your drum pad will sound like a mac truck barreling down a gravel road. You can use a drum stand for your pad, set the pad on your knees, or place a towel underneath your pad, computer or perhaps even both. Reducing or eliminating the vibration when you play is key.
Zoom has a handy feature (as does Skype) to let you hear what the other person will hear by recording a small snippet of what your mic is picking up and playing it back to you. This is important to use to test your setup.
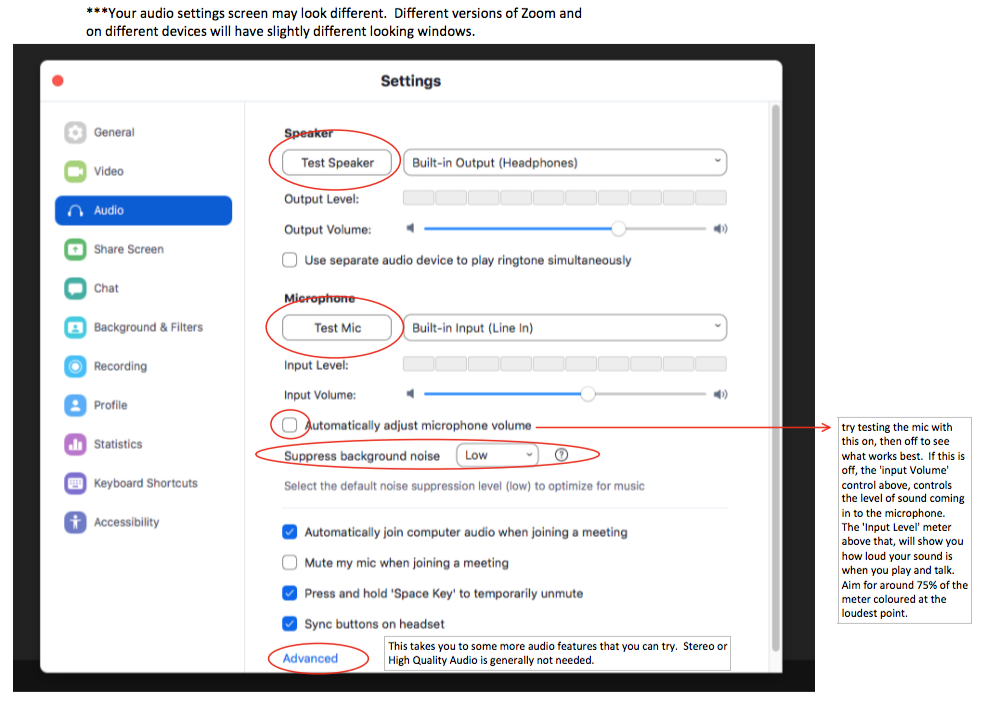
With Zoom, it’s also important to make sure ‘use original sound’ is activated. This feature of Zoom is not activated by default and needs to be set whenever you use the program for the first time and sometimes set again after you’ve updated the software. This feature that Zoom uses as its default setting, suppresses background noise so that only your talking is allowed to be heard and everything else is suppressed (which includes your playing). Your drumming needs to be heard obviously which is why you must activate the ‘use original sound’ option or I won’t hear any playing coming through. Again, using the ‘test mic’ feature will help you figure out what the other person is going to hear during your Zoom session. Below are some Zoom screenshots with points to important features. Depending on your Zoom software version and device, your screen may look slightly different than these pictures. Spend some time with the software and get to know it before your first lesson.
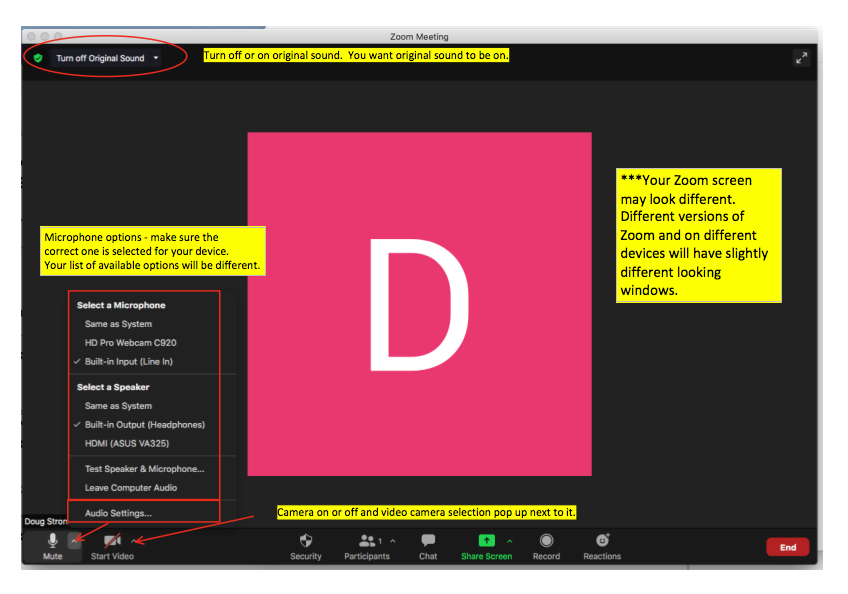
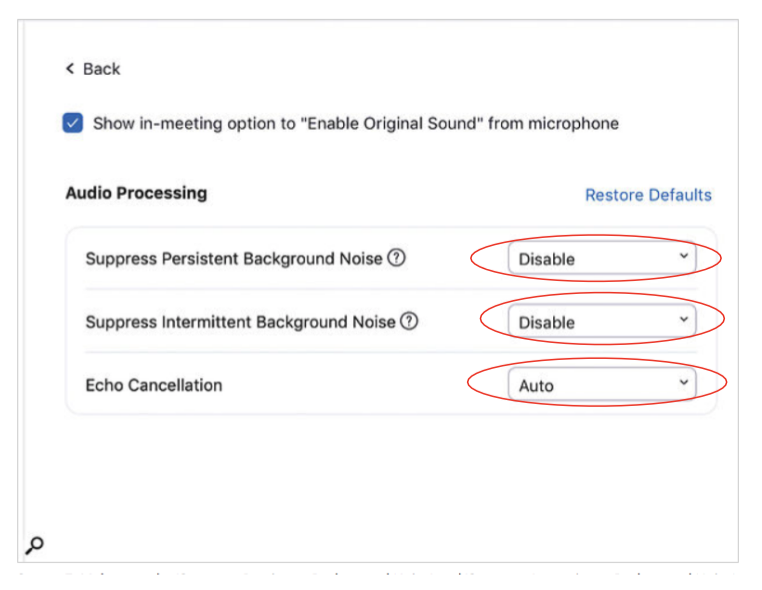
You may or may not get this screen depending on your version of Zoom.
The End – Phew!
This may seem like a lot of information to digest and figure out and in reality most online sessions work without any problems at all. That doesn’t mean the experience couldn’t be better for both parties if a little time was spent looking into the areas listed above. Online lessons and online competitions are here to stay and the more you connect with your inner techie, the easier all of these opportunities become. If you’re a current student with some online issues then feel free to email me directly and we’ll try to resolve them together.